lunes, 26 de noviembre de 2012

domingo, 25 de noviembre de 2012

making the neck - body mortise


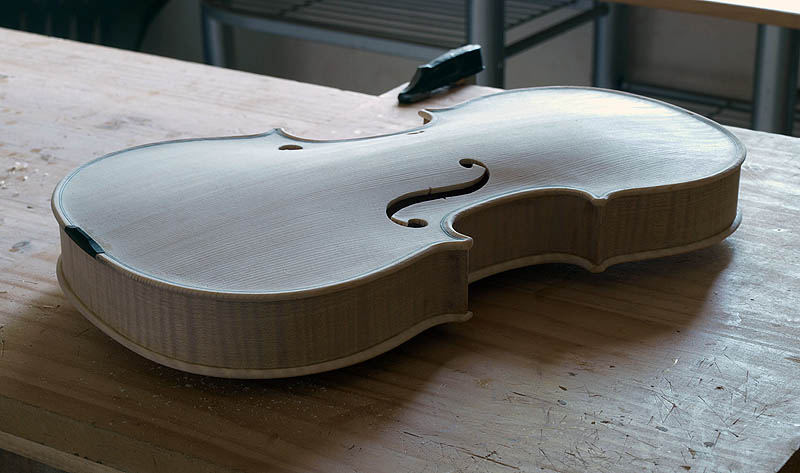
This is most probably the most delicate and difficult thing I´ve made untill now.
There are so many parameters that have to be correct. Strobels book says:
1) the fingerboard is centered over the front centerline.
2)The neck and scroll is vertical and not twisted sideways
3) The nut is 130mm from the upper front edge
4)The depth of the mortise lets the lower end of the neck extend to the inner edge of the purfling groove or a little past it.
5) the height of the fingerboard over the upper edge of the front is 6 - 6,5mm.
6)The projection of the fingerboard at the bridge line is 27 mm
7) The heel of the neck meets the back button tightly all around and is sufficient for the back button height of 13 mm.

That sounds easy. Just dont forget that all this has to be a very tight fit because its going to be glued with Hot hide glue.
So I sharpened the chisel and started sawing and cutting and I´m pretty sure its all correct. This can of course be done with jigs and routers, but there´s something about sawing and chiseling within tent of a milimeter early in the morning, so thats what I did. Just like the old masters.

miércoles, 21 de noviembre de 2012

Panama rosewood

Here´s # 101 being assembled. I like very much the subtle contrast between the Panama rosewood sides and the Indian roswood soundport. There´s contrast, but its a not a hard contrast but the inlay kind of grow out of the sides. I think its very organic and with a set of dark indian rosewood bindings its goig to be very elegant.


jueves, 15 de noviembre de 2012

Starting number 101

Number 101 is something special. A Panama rosewood negra with mechanical pegs and an inlayed soundport.
The Panama rosewood is the last set I have. Thats a petty because I really like it. Its some 10 - 20% lighter than East Indian rosewood but with a very nice high ringing taptone. Not to glassy, but more woody.. This should mean a slightly faster attack and less sustain.
I would have liked to buy more of this wood. But what happened is that I bought it some 7 years ago and stored and aged the wood for 4 years  before making the first guitar with the wood.  I liked it a lot and  decided to buy more, but since then I have only been able to find sets of a much poorer quality. Flatsawn and expensive. So its another tonewood that I will not use anymore. But I´m going to enjoy building with this set. The color is very pretty. I´ll call it nut brown and it´ll make a beautifull contrast with a set of dark indian rosewood bindings.
The soundboard is a piece of German spruce


miércoles, 14 de noviembre de 2012

Gluing the belly

And here we go with the gluing of the belly. Same show. Just a bit easyer because with the back on, the rib structure is a lot more stable. 


lunes, 12 de noviembre de 2012

Gluing the back to the sides:

The way I, and others, glue is to put hot hide glue on both surfaces. Let it dry, clamp it together and the loosen on or twoo spool clamps a time and reheat/moist the glue with a hot knife that has been in almost boiling water.
This way you can control that everything stays where it should stay and its slow and relaxing. Two important words for me these days. 


sábado, 10 de noviembre de 2012

Ready to assemble the body

So here´s the 3 parts that will make the body of the violin. All ready and glue is being heated in the glue pot. Nimbus is waiting for things to happen as well. 


lunes, 5 de noviembre de 2012

Preparing the bass bar.

Instruments of the violin family only has 1 brace. The bass bar. Its below the bass side foot of the violin bridge.
Its standard procedure to use chalk to fit the bass bar. You put chalk on the inside of the soundboard and rub the bass bar over it. The you cut away the parts of the bar where there´s chalk left untill you reach a point where the whole bar has chalk on its gluing side. Then its ready to be glued.


sábado, 3 de noviembre de 2012

making a mini scraper

Just a small thing... Its weekend.

making a mini scraper. The hole in the middle is there, so that it can hang on a nail and not disappear just like the last one did......


jueves, 1 de noviembre de 2012

The happy violin builder


Here I am cutting the f-holes on a cutting V. The thing I like the most about building a violin is that its quiet and slow. I love that. Good for listening to music and besides, I strongly prefer cutting and scraping over sanding.